

Introduction to a powerful single-channel WiFi relay Shelly1
Today, I want to acquaint you with an intriguing device. It’s a Wi-Fi relay based on the ESP8266 controller, which is why it will be easy to add to your smart home. In the articles on the site, you have already come across devices from other companies that use ESP32\ESP8266 (for example, Sonoff.) ( 1, 2, 3 )
Shelly is a pretty new yet powerful startup from Bulgaria. The company’s devices earn a lot of European and Americal quality certificates, as well as various awards in the smart home field. Shelly has a market on AliExpress and its internet shop with prices in Euros. It has cheap delivery almost worldwide.
Today, this company has a powerful production. Shelly produces a wide range of relays, lighting devices, meters, switches and sockets, wireless buttons, and all kinds of sensors for the smart home.
The hardware part of Shelly 1
You can use Shelly 1 for both remote controlling your outlets and lighting. The advantage here is that you can control the lighting remotely (using an app) and the usual switch simultaneously.

As you can see in the photo, the device is compact. The main task in its development was to make sure that the device fits into an outlet box with an outlet or switch body. Let’s look at how engineers succeeded in this task. Below, there are two outlet boxes for plasterboard, one being deeper.


As you can see, in the first photo with a smaller outlet box, the body of an outlet or a switch will protrude about three to four millimeters. Take this into account when buying electrical before repairs. Also, find a place for wires. I must say, I used a standard outlet. There are also those whose body is slightly distant from the plane of the wall.
If you use switches, pay attention to the flex switch I already wrote about, its interior is very compact, and the switch won’t “look” out of the outlet box.
We see a deeper outlet box in use in the second photo. When using a case of similar size, there shouldn’t be any problems with free space for Shelly 1. Besides, you can place Shelly 1 in a regular mounting box.
One of Shelly 1’s wiring diagrams can be like this:

When mounting, note that the relay of the device can take up to 16A. As you already understood, you don’t need the switch to control the relay. Terminals “0” and “I” are relay outputs, and such contacts are named “dry” sometimes. It is because they don’t connect to the main logic circuit of the device. In theory, you can connect devices with a low supply voltage to such contacts and control the supply of voltage to such devices using Shelly 1. The supply voltage on the Shelly 1 relay should apply to the terminals “L” and “N.”
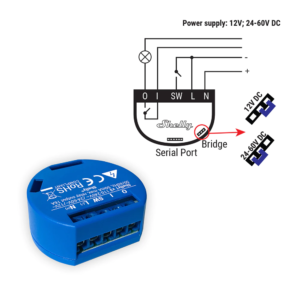
The device’s power supply voltage range is extreme, from 110V to 240V alternating current or 24-60V direct current. You can also change the power mode using a jumper on the case, and then the power supply voltage will be 12V DC. The jumper is under the plug, and getting to it can be quite hard.
There is a connector nearby where you can download custom firmware for Shelly 1, but I don’t think there’s much point in doing that. The fact is that Shelly allows you to unpair your devices from your cloud and enable local management. Such actions make it possible to control Shelly 1 from alternative smart home management systems, such as Home Assistant. In addition, you can control the relay even from the browser.
Configuring and managing devices in the Shelly app
Firstly, download and install the official Shelly application on your smartphone. Then register your account, which allows you to manage Shelly devices from anywhere in the world where there is access to the network.
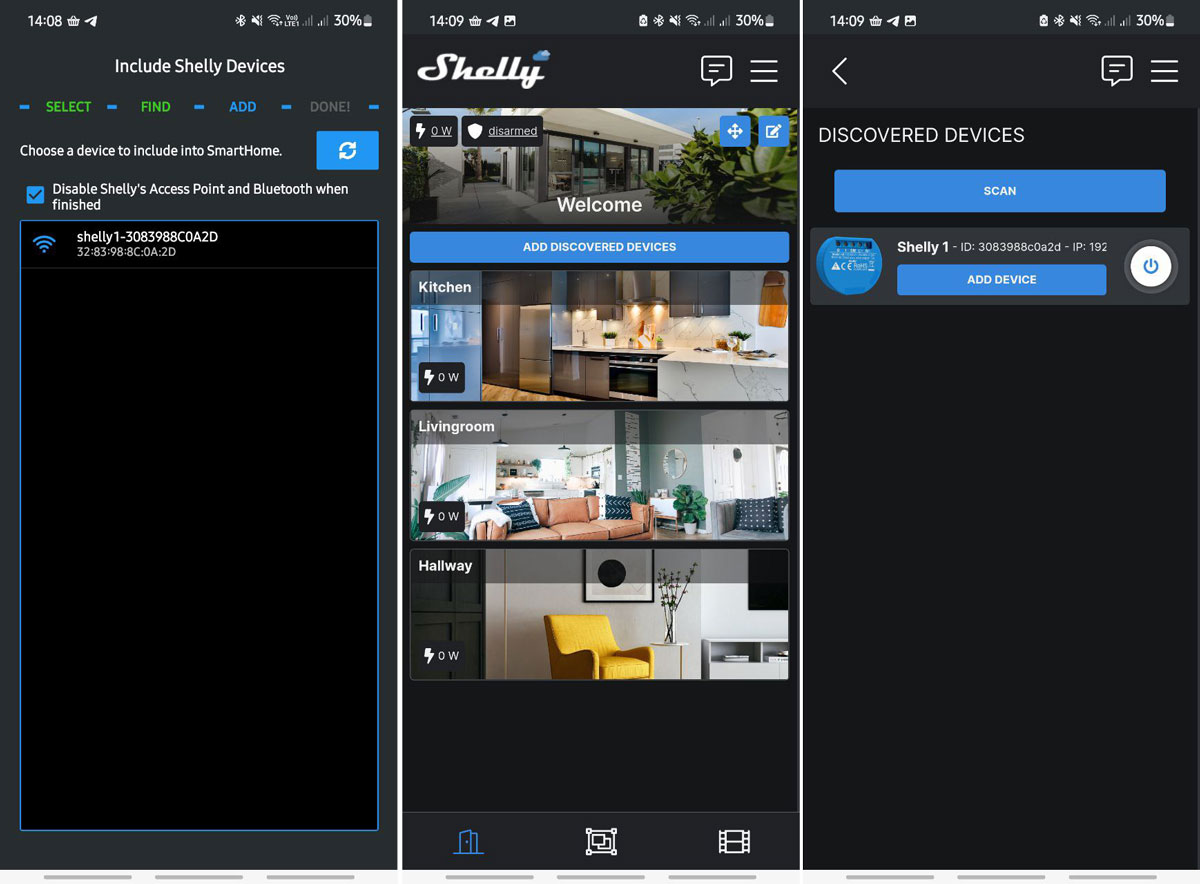
To set up and add the device to your home, connect the wires as shown in the photo below.

Once turned on, Shelly 1 will create its Wi-Fi hotspot, and you can now connect and configure your device. To do this, select the “Add device” item in the menu. Once detected, you will see it in the list. Then you can add it to the necessary room or change the picture of the device.
To go to Shelly 1’s settings, click on its image in the “room window.” As you can see, the list of possible parameters is big. We can use the timer and schedule of the device. Below, in the “Cloud” section, we can disconnect the device from the cloud. In the “Settings” section, you will find the settings of Shelly 1 regarding the device behavior after power loss. There are four options for the status after power-on: “on”, “off”. “save state after power consumption”, and “according to the state of the switch”. In my opinion, this is a unique and quite useful feature. In addition, in the settings, there is an opportunity to indicate which switch you will use, keyboard (button, flex), or regular.
It is also interesting that we can choose what our relay will control, for example, an outlet or lighting.
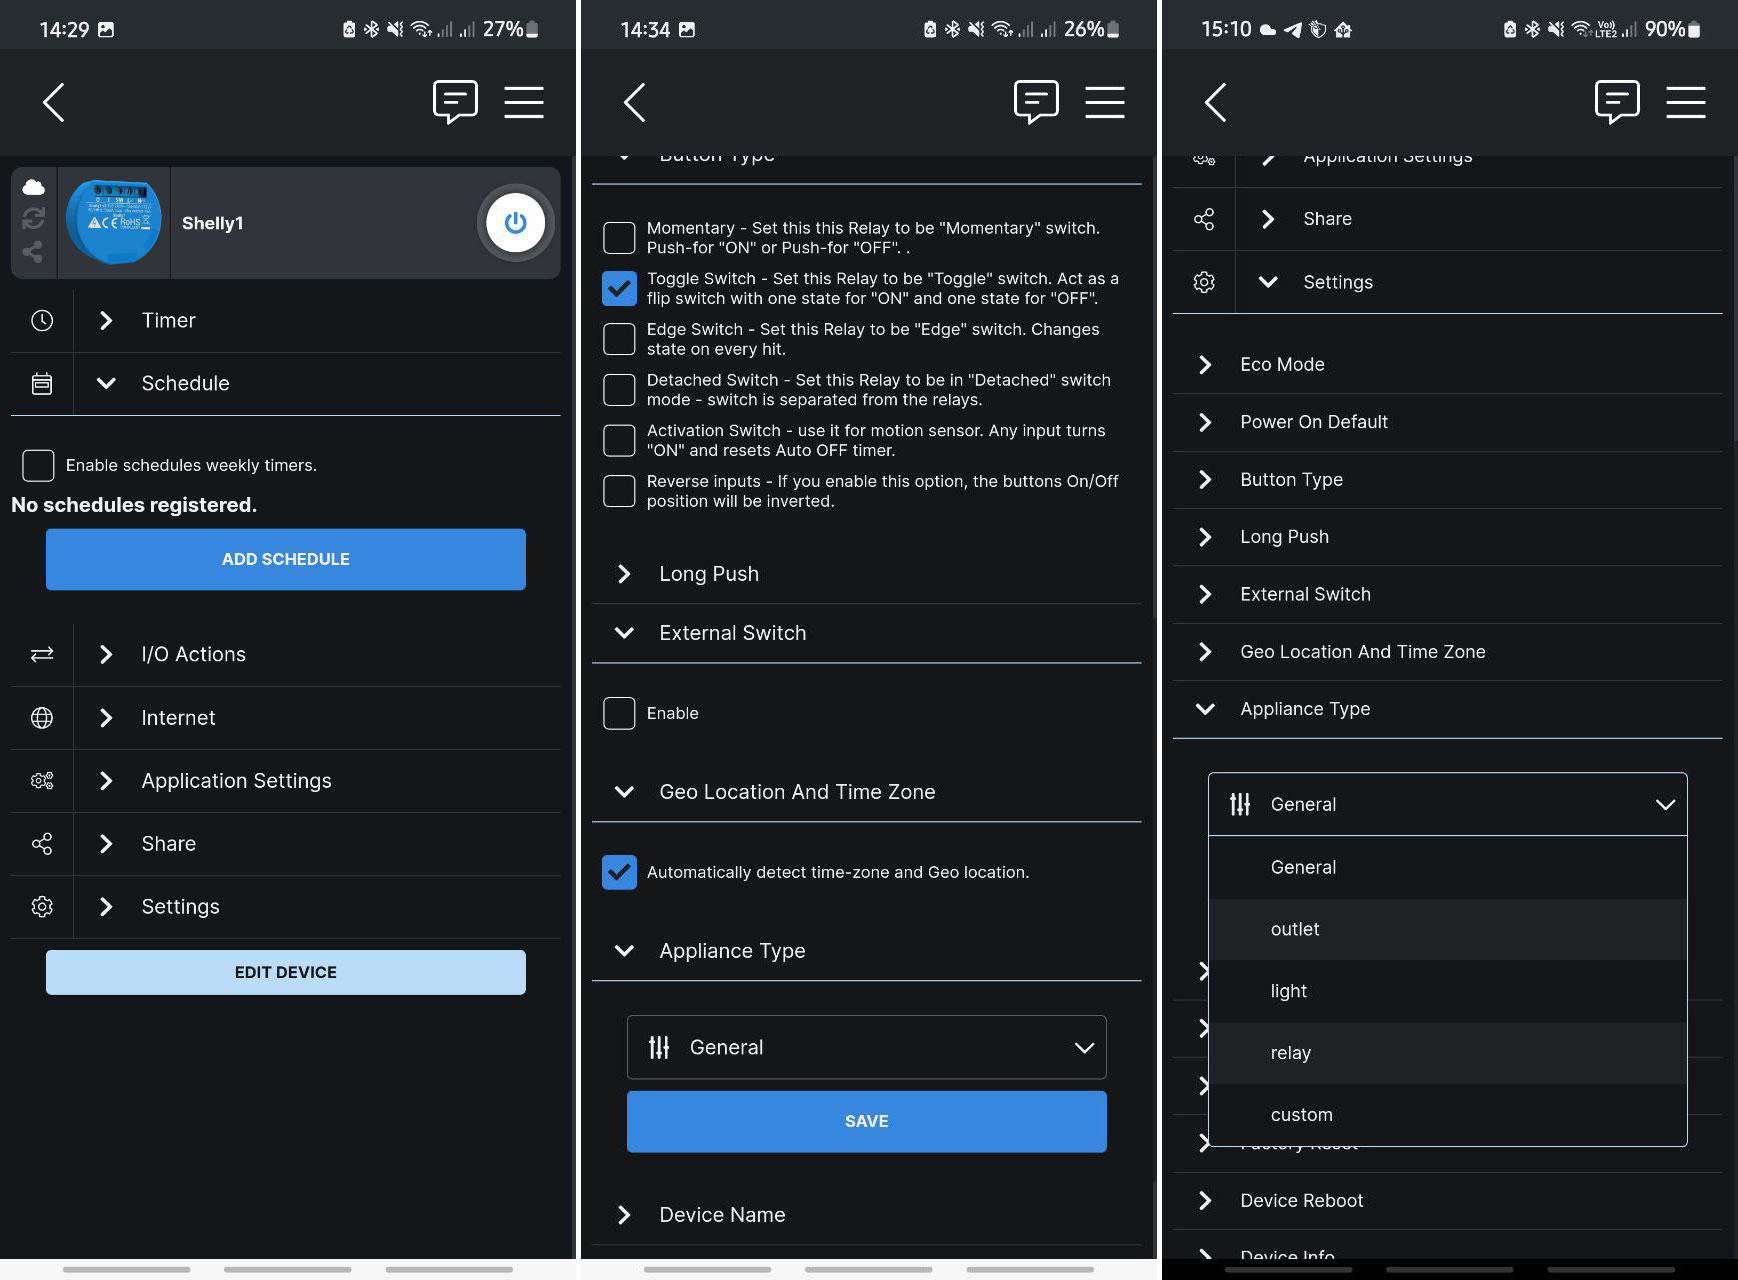
In the settings, we can also reboot the device, remove it or reset it to factory settings.
Shelly 1’s web interface
To access the web interface of Shelly 1, you need to know its IP address. To do this, you can look at the address in the router settings. But, to not do it every time, you should set a static IP address for the device. The interface of the page is a bit like the interface of the application, but in my opinion, a larger computer screen will be more comfortable.
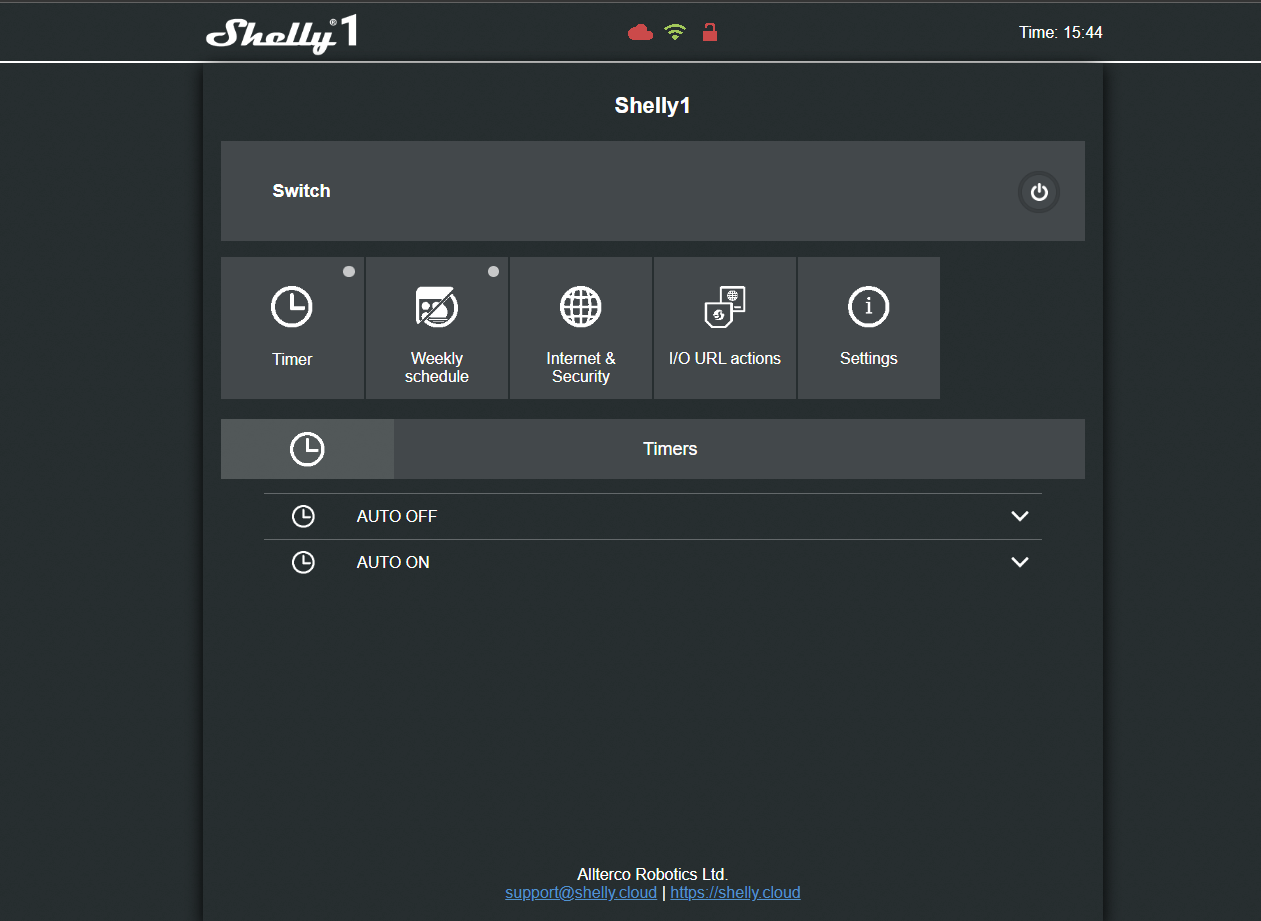
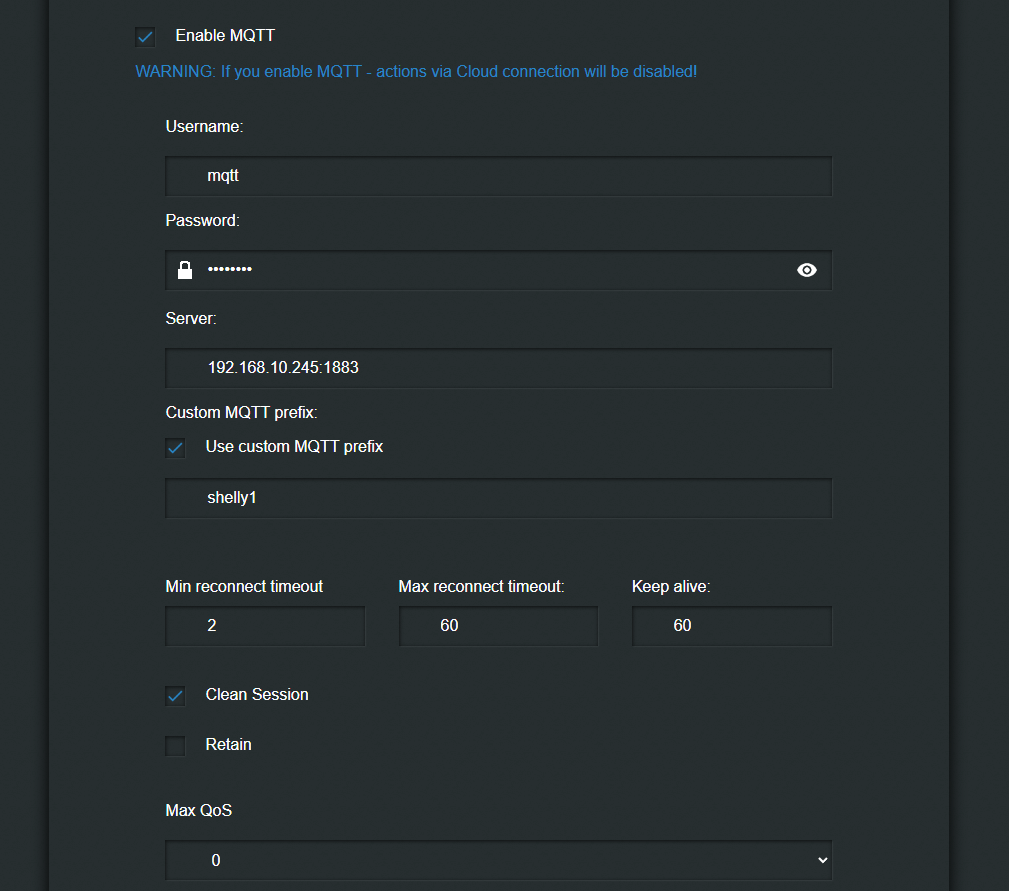
There are even more settings here than in the mobile version. One of the more interesting points in the web interface is the ability to enable and configure MQTT. But you are warned that turning it on will disable the cloud connection, which is not a huge loss when the possibility of controlling the device in alternative smart home systems appears.
Shelly 1 and Home Assistant
As soon as the Shelly device appears on your local network, Home Assistant will immediately “see” it.

All you have to do is confirm the configuration settings and choose a room for the device. By the way, the device that “flies” into Home Assistant is the same device you selected in the Shelly app. Now you can control the device with Home Assistant and the response time is almost instantaneous.


